
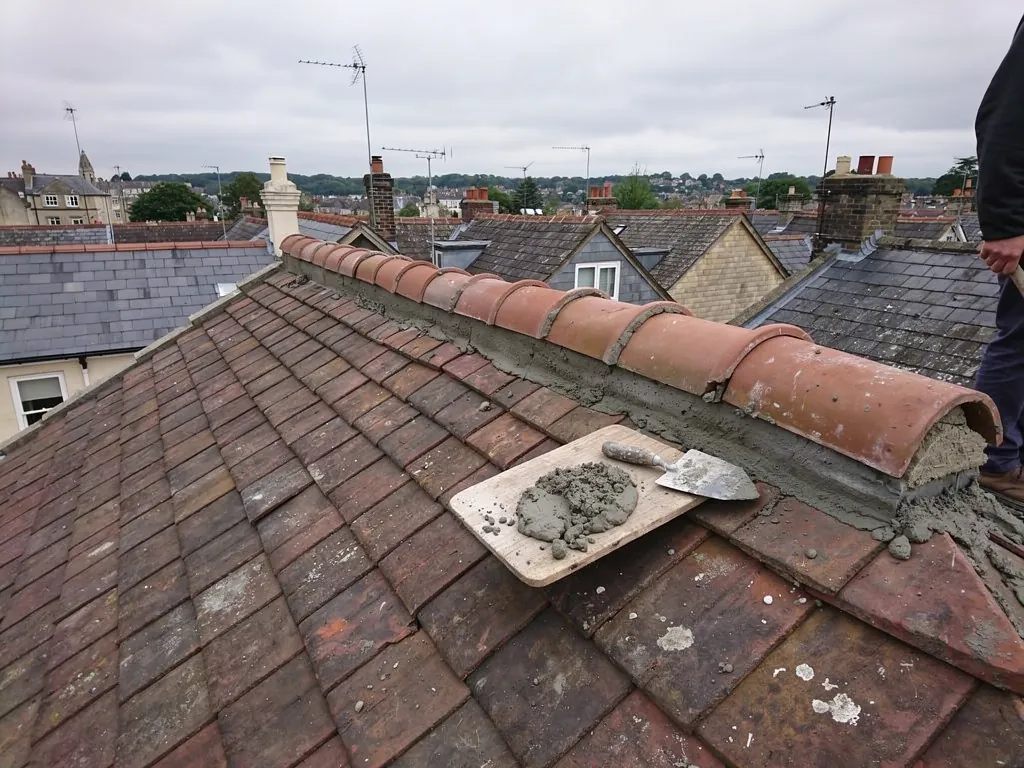
A hipped roof has slopes that meet at sloping angles as well as at the top, and each of those angles is capped by a line of hip tiles that starts at the ridge and finishes at the eaves. Because a hip falls steeply, gravity works on its tiles all the time. They are bedded in mortar, tied to the timber beneath, and held from sliding by a small metal bracket at the bottom called a hip iron. When any of those three things fails, the hip tiles begin to loosen, creep downhill, or drop altogether. This guide is for the owner who has seen a hip tile out of line, or found mortar crumbs below a hip, and wants to understand what is going wrong and what the choices are. It covers how a hip is built, the common failures, the repair routes and the dry hip alternative. Ridge work follows its own method, described step by step in re-bedding ridge tiles, so this page stays with the hip.
How a hip is built, from the rafter up
Under a hip sits a hip rafter, a diagonal timber that runs from the corner of the walls up to the ridge. The roof tiles on the two adjoining slopes are cut to follow it, leaving a neat mitred line along each side. On a slate or plain tile roof, that line is sometimes covered by lead or by purpose-made hip tiles. On other roofs, the tile edges are left to meet at a bedded hip cap.
The hip tiles themselves are laid in a line down the angle. Most are curved, like a ridge tile, or angled with a pointed profile. A bonnet hip tile, which has a stepped shape that follows the courses beneath, is a different style again, and we look at that in our page on bonnet hip tiles. Each sits in a mortar bed spread over the cut edges of the roof tiles, filling the gap between hip tile and covering to keep rain out.
Up at the crown, the hip line runs into the ridge. Down at the eaves, the lowest hip tile, sometimes called a starter or end tile, finishes the run. This is where the weight of the whole line comes to rest. If the bottom tile slips, the whole row is free to follow it, and that is what the hip iron is there to prevent.
That is why a hip is a heavier-duty detail than a ridge. A ridge tile sits on level ground, so friction and mortar are enough to resist small movement. A hip tile rests on a slope, so it needs a mechanical stop. Understanding that makes the symptoms easier to read: a hip that has moved is nearly always one whose stop has failed.
What a hip iron does, and how it fails
A hip iron is a strip of metal, shaped like a hook or a bracket, fixed to the hip rafter at the bottom of the hip. It sits beneath the lowest hip tile and holds the line from sliding. Fitted to the timber, not the mortar, it takes the load directly into the structure. The page on hip irons goes into the detail of the types.
Hip irons fail for a few ordinary reasons. The first is corrosion. A plain steel iron, or one whose coating was thin, rusts in damp conditions, and a rusted iron loses its section and its grip. The second is movement: where the screws or nails have worked loose, or the rafter below has shrunk or rotted, the iron no longer holds firm. The third is omission. On some older roofs the hip tiles were laid on mortar alone, and no iron was ever fitted. They stayed up for years because the mortar was sound, and when it broke down, there was nothing else to stop them.
If the iron has gone, the hip tiles will often shift a little and then settle against whatever is left of the bed. You may see a hip tile at the bottom pushed out past the eaves line, or a gap opening between the tiles higher up where they have slid apart. Sometimes the first sign is a tile on the ground.
A new iron should be non-corroding and fixed with fixings that suit the timber. It has to be placed so the lowest tile sits correctly against the roof edge, not tilted. Where the rafter is soft, the iron cannot do its work, so the timber is dealt with first. Hidden parts like this separate a hip that is tidied for a season from one that is put right.
Why hip tiles come loose
The mortar bed is the usual starting point. Hips are exposed on two sides, take sun and frost, and flex a little with the roof. After enough winters the bed splits along its length and starts to crumble. Water then gets in under the tiles, and in cold weather it freezes and lifts them. You will often find the cracks first at the joints between the tiles, where there is the least bedding.
Poor original work can bring the same result sooner. A hip bedded on a thin bed, with voids beneath, will drop mortar early. A hip laid without a mechanical fixing relies entirely on mortar, which is not how current practice goes. BS 5534:2014 asks for mechanical fixing of ridge and hip tiles, and the manufacturer guidance we follow makes the same point: mortar by itself should not be relied on to hold them.
Wind adds to the load. A hip on an open or tall house is a line the weather can get under, and a loose tile at the top is the first to lift. Storm damage on a hip is often a few tiles missing from the middle of the run, with the rest still in place. That kind of damage is dealt with differently from slow, general decay, and the immediate steps are laid out on the page about storm damage to ridge tiles.
Finally there is the movement of the roof itself. Roofs settle. A hip rafter that has dropped, or a gable that has shifted, changes the line the tiles sit on, and cracks follow the movement. If a hip shows cracks that keep reopening after a repair, the cause may lie in the structure below it, and we look for that before laying anything again.
Repair routes: spot repair, re-bed or replace
The right repair depends on how far the failure has spread. Three routes cover most hips.
A spot repair
Where one or two tiles have loosened and the remaining mortar still grips, those tiles can be lifted, cleaned and set again, with the iron checked at the same visit. This is the smallest job, and it suits a hip that is otherwise sound. It is only worth doing if the surrounding mortar is truly sound, so we test it by tapping and by looking for hairline cracks beyond the obvious one.
Re-bedding the whole hip
When the bed has failed along the length, the sensible answer is to lift every tile, clean the line, check the rafter and the iron, and lay the tiles again in new mortar with mechanical fixings. It is the same principle as a ridge re-bed, carried out on the slope. The tiles are numbered or laid out in order, so they go back in sequence, and the sound ones are reused.
Replacing tiles or the hip detail
Where tiles are cracked, frost damaged or missing, they are replaced with a match in colour and profile. That is harder than it sounds on an older roof, where the profile may have gone out of production. We search reclaimed stock first and fall back on a close new match. On some roofs the whole hip detail is changed, for example from a mortar-bedded hip to a dry hip, for reasons covered below.
In every route, the order is the same. The tiles come off, the line is cleaned, the rafter and iron are checked and put right, and the new work goes on with fixings. The mortar is the weather seal and the fixings do the holding. Scaffold is needed, as a hip has to be worked on from the side as well as above, and it is named on the quote.
Dry hip systems and when they suit
A dry hip replaces the mortar bed with clips, brackets and a flexible seal. The hip tiles are screwed or clipped to a hip batten or tray fixed to the rafter, and a ventilated or sealed strip fills the gap between the tile and the roof covering. There is no mortar to crack, and no pointing to maintain. BS 8612:2018 is the test standard such products are assessed to.
Dry hips suit roofs where the owner wants to avoid a repeat visit, where the roof is awkward to reach, or where the old mortar keeps failing. Because the fixings are built in, they also deal with the fixing requirement in one step. MyBuilder's dry ridge guide (2026) reports typical UK pricing at £40 to £60 for each linear metre, with a whole installation typically £500 to £1,000. Hips are different in detail from ridges, so use the figure as a guide to scale, not a quote for your hips.
They are not right everywhere. Dry systems have their own look, with clips and a flexible filler that can be visible up close, and on a listed house, or a roof that faces the street in a conservation area, the change may read as an alteration. Those cases need thought and sometimes consent, as explained in dry ridge on a listed building. A traditional mortar hip, properly fixed, is often the better match for an older roof, and nothing about the standard forces a change to dry-fix.
Age, appearance and your own wishes settle the choice. After the survey you have close photographs of the hips, a view on which route fits, and a written fixed price for the one you pick.
Hips beside verges, valleys and chimneys
A hip rarely fails in isolation. Its foot meets the eaves and gutter, its head meets the ridge, and its sides meet the slopes on either hand. A tile that slips at the foot can knock the gutter or drop onto the fascia below. Crumbs of mortar landing in the gutter can block the outlet. Where a hip meets a chimney or a dormer, lead flashings may be disturbed by the movement of the tiles above.
That is why the survey follows the hip down and across. We check the eaves tile and the gutter beneath, where the hip joins the ridge, and the roof tiles either side of the hip, which may have lost their bedding or chipped where a hip tile slid against them. If the roof also has gable ends, the verge is a similar mortar detail with its own problems, covered in our guide to mortar verge repair.
On a hipped roof the work is often done in one visit across ridge, hips and any verges, because the scaffold is already up and the same tiles and mortar are in use. That makes the most of the access, and it avoids a situation where one section is renewed while its neighbour is left to fail.
If you are unsure whether the problem is at the hip or elsewhere, the signs to look for from the ground are a hip tile out of line with its neighbours, a visible gap under the lowest tile, grit from the bed lying below, and stains on the wall under the hip foot. The main ridge, hip and verge page explains how the whole roof edge is surveyed. A pair of binoculars and a photograph of the hip from the garden are often enough for us to judge whether the iron or the bedding is at fault.