
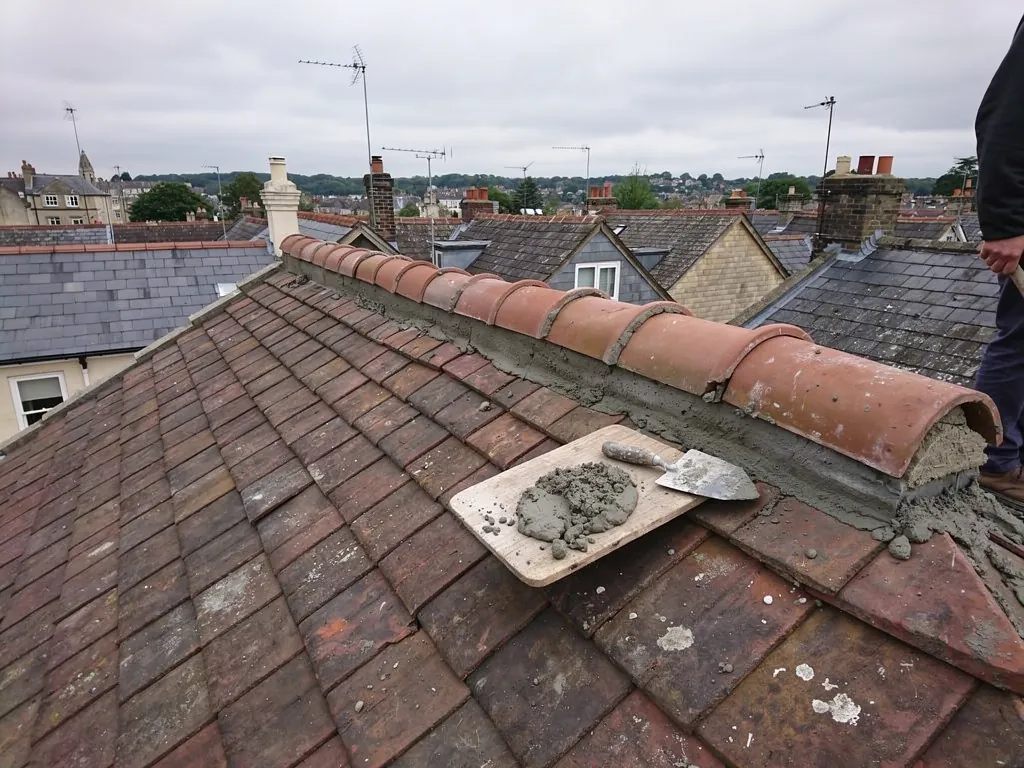
Where the two slopes of a pitched roof meet, the join is capped with a run of curved or angled tiles set in mortar. That capped join is the ridge. When that mortar cracks, drops out or loses its grip, the ridge tiles loosen, and wind and rain find their way in beneath them. Re-bedding is the repair that puts the same tiles back on a fresh bed. It sounds simple, and the bedding itself is the quick part. The value is in what happens around it: sorting the tiles, scraping the old mortar back to a clean surface, looking at the timber the ridge sits on, and adding the mechanical fixing that a modern standard now expects. This guide follows a re-bed from scaffold to clean-up, in the order we do it, so you can read a quote or watch the work with some idea of what each stage is for. It stays on the method. Costs, dry-fix alternatives and the choice of mortar have their own pages, which are linked where they come up.
What re-bedding is, and when it is the right repair
Re-bedding means lifting the existing ridge tiles, removing the old mortar, and laying the same tiles again on new mortar with proper fixings. Nothing about the roof covering below changes. The slopes stay as they are, and the ridge goes back looking much as it did, only sound.
It suits a ridge whose tiles are in good condition but whose bed has failed. The signs are familiar from the ground: a dark crack line along the joint between tile and tile, mortar dust on the gutter or the path, a tile that sits at a slightly different angle from its neighbours, or a gap where daylight shows under an end. From the loft you may see staining on the underside of the roof near the top, or a trail of old mortar crumbs on the ceiling insulation.
Re-bedding does not suit every ridge, and part of our survey is deciding whether yours is one. If only one or two tiles have slipped and the rest of the bed is firm, a spot repair is enough. Our guide to replacing a single ridge tile covers that case. If the tiles themselves are cracked through, frost damaged or no longer sit true on one another, lifting them again will not help, because a bed can only be as good as the tile pressed into it. And if the timber beneath the ridge has rotted, the job changes from a re-bed to a small carpentry repair first.
Where the ridge has gone past repair, or the owner would rather not return to the roof in future, the other route is a dry-fix system, which replaces the mortar with clips, rolls and fixings. That choice is set out in dry ridge or mortar. A traditional re-bed remains the right answer on many older roofs, especially where the look of a mortar ridge matters.
All of this sits under our wider ridge, hip and verge repairs work, and the method below applies to ridges in clay, concrete and stone-effect tiles alike.
Step one: access and lifting the ridge
The job begins with safe access. The ridge stands at the very crown of the roof, so it is worked from scaffold or a tower, with a platform that lets the roofer kneel along the line of the ridge without standing on the slopes. On a low single-storey roof a ladder and roof ladder may be enough. On a three-storey house the scaffold may take up as large a share of the price as the labour, which is why it is named on the quote.
Each ridge tile is then lifted by hand, working from one end. The old mortar has rarely kept its grip on the tile, so most come away cleanly, but some hold on and have to be freed with a chisel or the back of a trowel. The tiles are passed down or stacked on the scaffold platform, not dropped along the roof, because a cracked ridge tile is a wasted tile.
As they come off, they are laid out in order. Ridge tiles on a hand-made roof are not always identical, and a roofer who keeps them in sequence can put them back so that the joints close tightly. Every tile is looked at for cracks, chipped ends and frost spalling, which is where the face of a clay or concrete tile flakes away. Sound tiles are kept. Damaged ones are set aside for replacement, and the match matters: a new tile in the wrong colour or profile shows from the street. On older roofs we look for matching tiles from reclaimed stock before reaching for new ones.
While the ridge is open, the top course of roof tiles on each side is exposed. This is the first chance to see whether it has slipped, whether the battens (the thin timber strips the tiles hang from) are sound, and whether the underlay beneath has perished at the top edge.
Step two: cleaning down to a sound bed
Fresh mortar will only hold to a clean, sound surface. Once the tiles are off, the old mortar is scraped from the ridge line and from each tile. On the roof this means working along the top of both slopes and clearing the loose material from between the top course and the ridge. The debris is gathered up in buckets or a sheet, not swept down the slope, where it blocks gutters and drops on whoever is below.
The same goes for the tiles. Each one is cleaned of old bedding on the underside and along its ends, so the new mortar meets the tile itself, not a crust of the old. Dust is brushed off. On a dry surface, the roofer may dampen the tile slightly so the mortar does not lose its water too quickly, which weakens the set.
With the line clear, the real inspection starts. We look at the ridge board or ridge batten, the timber running the length of the rafter tops, which carries the bedding and the fixings. If it is firm, the job continues. If it has gone soft, split or been lifted by old corroded nails, it is repaired or replaced before anything else is done, because a mechanical fixing needs solid timber to hold. We also check the underlay at the ridge, the sheet laid beneath the battens to catch what gets past the tiles: on many older roofs it has dried and cracked where it was exposed, and a loose strip there lets water in no matter how good the new mortar is. A ridge underlay strip, or a proper ridge vent where the roof calls for one, can be added at this stage.
This is the stage a hurried repair skips. Mortar laid over the dust and rubble of the old bed may look sound on the day and then drop within a season. Cleaning the line properly is the cheapest insurance against doing the work twice.
Step three: laying the new bed
The new mortar is mixed on site. A ridge bed is a sand and cement mix on most modern roofs, and a lime-based one on older and listed roofs, for the reasons set out in our page on ridge tile mortar mix. It is mixed to a workable, not sloppy, consistency, because a wet mix slumps under the tile and shrinks as it dries. Colour matters too. A grey cement bed against a warm red ridge looks wrong from the pavement, and oxide pigments or the right sand can bring the mortar close to the colour of the tile.
Bedding starts at one end. A line of mortar is laid along the top of both slopes so it fills the space under the ridge tile and sits snug against the top course of roof tiles. The first ridge tile is pressed down into it, and its end is tidied. The next tile is set against it, with a thin buttering of mortar on its end if the profile calls for one, and pressed down to the same line. The roofer sights along the ridge as the work proceeds. A ridge that wanders is more visible than a tile that is slightly off, so the line is held with a string or by eye.
The bed has to be full. A ridge tile sitting on two thin ribbons of mortar with a void below is weak, because the void gives wind a way to work at the tile and the mortar a place to crack. Pressing each tile into the bed until a little squeezes out at each edge is the sign that the space is filled.
The mortar is not asked to do all the holding on its own. That is the next stage, and the one that separates a repair that lasts from one that does not.
Step four: mechanical fixing under BS 5534
BS 5534:2014 changed the expectation for a bedded ridge. As Marley's guidance reads it, the grip of the mortar by itself can no longer be counted on to keep a ridge or hip tile where it is put, so every bedded tile or fitting should also carry a mechanical fixing. A ridge held only by its mortar is not how the work is meant to be done today.
In practice the mechanical fixing for a mortar ridge is a corrosion-resistant fixing that ties each tile to the timber below. Depending on the tile and the roof, that may be a screw or nail through a pre-formed hole, or a bracket or strap fixed to the ridge timber that the tile is bedded around. The fixing must go into sound timber, which is why the earlier inspection matters, and it must be made of a material that will not rust, because a fixing that corrodes loses its grip and stains the tile. The mortar then acts as the weather seal and the bed, and the fixing does the holding.
Exposed positions need the most care. A ridge on a tall house, or on a roof that takes the wind from an open side, faces the greatest uplift, and the fixings should reflect that. The exact method is chosen for the tile and the exposure, and it is the manufacturer's instructions and the standard that decide it, not habit.
If you would prefer to remove the mortar from the picture altogether, a dry-fix system uses clips and seals rather than a bed, and is assessed against BS 8612:2018, the standard that dry systems for verges, hips and ridges are measured against. That is a different job, covered in BS 5534 ridge fixing and on the page about dry verge systems.
Step five: finishing, weather and what to expect afterwards
Once the tiles are bedded and fixed, the joints are struck off and the surplus mortar is cleared from the faces of the tiles before it sets. Pointing is tidied neatly but not smeared across the tile, because mortar left on the face stains and gets dirty. Ridge ends, where the line meets a gable or a hip, are finished with an end tile or a mortar fillet that stops water running behind the last tile. Hips are a related job, and we cover how they differ in our guide to hip tile repair.
Weather decides when the work can be done. Fresh mortar needs to set without being washed out or frozen, so we do not bed in heavy rain or hard frost, and a covering sheet protects newly laid work if the weather turns. If the forecast is unsettled, the job moves, and a leaking ridge is made safe in the meantime. Mortar then needs time to cure, and the ridge should not be disturbed during that period.
At the end the site is left clear, we take the waste away, and the scaffold comes down. You should see a straight line across the crown of the roof, with even joints and no loose debris in the gutters. We photograph the finished ridge so you have a record beside the pictures taken at the survey. Check the ridge again after the first winter, looking from the garden for any gaps in the bedding or tiles that have moved, and send us a photo if something looks out of line.
A re-bedded ridge is not a permanent fix in the sense that nothing will ever need doing again. Mortar weathers, and the ridge is the most exposed line on the roof. It is worth looking at it from the ground after a hard winter, and again after any storm. Our page on loose ridge tiles lists the signs, so a small problem is caught before it grows.