
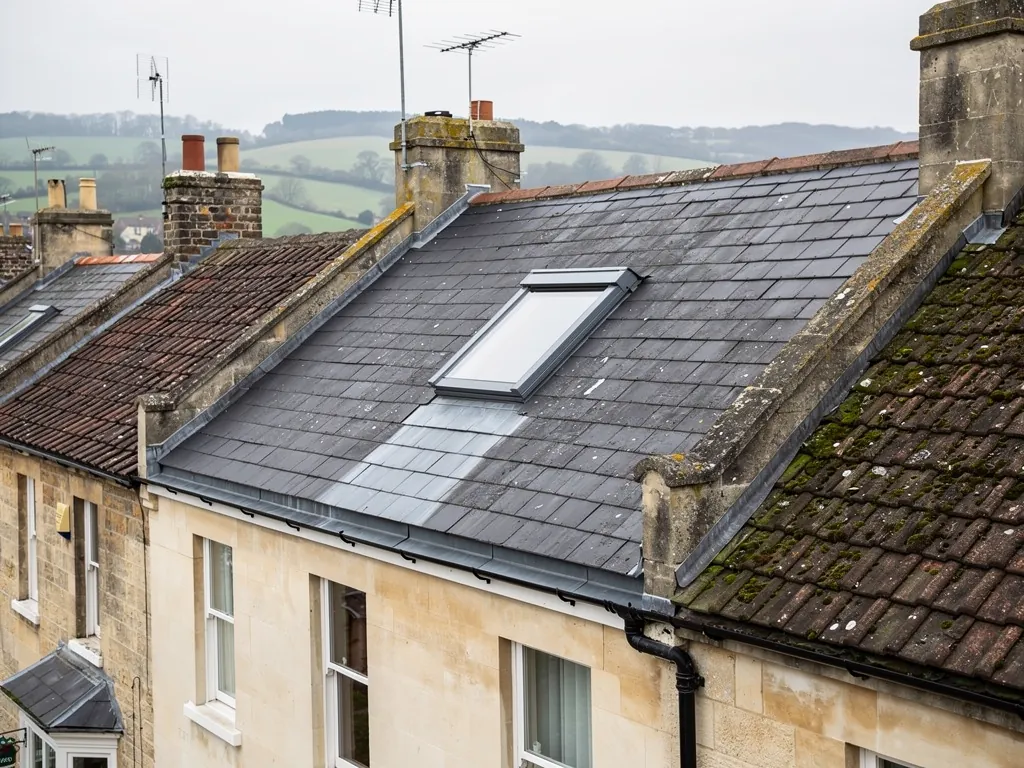
Most roof windows that leak do not have a faulty window. The glass is sound, the seals are intact, and the water is getting in at the edge, where the frame meets the roof covering. That edge is sealed by a flashing kit: a set of shaped pieces, supplied for a particular window and a particular type of covering, that carry rain over and around the frame and back onto the slope. A flashing is a shaped piece of waterproof metal bent over a junction so that rainwater is turned away from the gap. This guide explains how a kit is built, why the kit for plain tiles is not the kit for slate, how the pieces are laid in order, and what goes wrong when the kit does not suit the roof. It is about the sealing detail only. Other guides cover cost, regulations and the process of swapping a window.
What a flashing kit is made of
A roof window cannot be bolted onto a roof and left. Water arrives from above, runs down the slope, and meets a box-shaped frame in its path. The kit is the set of pieces that makes the frame look, to the water, like part of the roof. Most kits are supplied as one boxed set matched to the window size, and they usually contain four kinds of piece.
- A bottom apron, which sits below the window and lies over the covering beneath it, so water leaving the frame lands on top of the tiles or slates below.
- Side pieces, often called side gutters or side flashings, which run up each side of the frame and channel water down past it.
- A top piece, which sits above the window and sheds water that runs down from higher up the slope round to either side.
- A collar or membrane skirt that connects the frame to the underlay, the membrane that lies across the rafters beneath the tiles or slates.
The principle is the one that governs every roof detail: water must always run over a joint, never into it. The bottom piece overlaps the covering below. The side pieces tuck beneath the covering on either side. The top piece is overlapped by the covering above it. Everything is lapped in the direction of flow, like the scales on a fish.
Kits are made of aluminium, lead or a combination, and the choice follows the covering and the appearance you want. On a period roof, lead is the traditional metal because it can be dressed by hand into any profile, and a trade lead code is selected for the job. Aluminium kits are lighter and come ready-formed. Either can be right. What matters is that the kit was designed for the window model and the covering type, which is the point most of the rest of this guide turns on.
Why tiles and slate need different kits
The covering decides the kit because the covering sets how thick the edge of the roof is and how well it can be dressed around the frame. A profiled interlocking tile is deep, with raised and flat sections, and water can run in the channels between the ribs. A plain tile or a slate is thin and flat and lies in overlapping courses. A kit made for one cannot seal the other.
Window manufacturers therefore sell different flashing kits for different covering depths. Check the product code for the kit, and match it to the covering, before it is ordered. A kit for a flat slate profile on a deep pantile roof would leave gaps under the apron where the ribs rise. A kit for a deep tile fitted into a thin slate roof would stand proud of the slates, and water would run beneath its edge.
Natural slate has its own demands. Slates are laid with a head lap, a measured overlap between one course and the next that stops water being driven upslope by wind. A flashing in slate has to respect that lap, which is why on many slate roofs the sides of the window are formed with lead soakers, small pieces of lead interleaved with the slates, one to each course, and turned up against the frame. The kit's own side pieces then sit over them. Where a kit does not suit, a slater can often make the detail in lead, but the detail has to be planned before the opening is cut.
Stone and clay tiles bring their own thickness and unevenness. A heavy Cotswold-type stone tile does not lie as flat as a machine-made one, and a kit that works on the rated depth of a concrete tile may leave a gap on an old stone roof. We look at the covering on site, measure it, and choose the kit from that rather than from the order sheet. Our guide to fitting a roof window in a slate roof covers what slate adds.
How the pieces go in, bottom to top
Flashing is installed in a set order, and the order is what makes it work. The opening is cut, the frame is screwed to the rafters and the trimmers round the hole, and the nearby battens (the small timbers that carry each course of tiles or slates) are adjusted so the frame sits at the correct height against the covering. Then the kit goes in.
The underlay collar
First the membrane that links the frame to the underlay goes on. It forms the second line of defence. If water does get past the visible metal, it should run onto this sheet and out under the covering, not down into the loft. A collar that has been left out, torn, or lapped the wrong way is a classic cause of leaks that appear only in driving rain.
The bottom apron
The lower piece is fixed next. It is slid under the covering above its upper edge only where the design allows and laid over the covering below, so water from the frame spills on to the tiles or slates beneath.
The side pieces
The side pieces come next, each overlapping the apron and tucked below the covering along the side of the frame. In tile, they are formed to the tile profile. In slate, the lead soakers go in course by course as the slating is rebuilt around the frame, then the side flashings sit over them.
The top piece
Last comes the top piece, which sheds the water coming down from above. The covering above is slid over its upper edge. If the order is reversed, water runs into the joint instead of over it.
The order is also why a flashing cannot be properly fitted from inside, or by laying a window into an opening that already has covering round it. Some of the covering must be lifted so that each piece can be lapped properly. Our guide on replacing a roof window shows how that is handled when an old window comes out and a new one goes in.
How the wrong kit lets water in
A flashing fails in a few predictable ways, and most trace back to the kit not matching the roof or the order of work going wrong.
The first is a kit sized for the wrong covering depth. If the apron stands proud of a thin covering, or sits below the surface of a thick one, there is a gap between metal and roof. Wind-driven rain gets into that gap and runs sideways beneath the covering to the nearest nail hole or batten joint, and from there into the loft. The drip appears away from the window, which sends people looking in the wrong place.
The second is a kit from a different window model. Window manufacturers change frame dimensions between ranges, and a kit made for one range may be a few millimetres out on another. A small mismatch at the corners can be enough to open a path for water, especially at the lower corners where the apron meets the side pieces.
The third is the reuse of an old kit. A flashing that has served one window is not guaranteed to suit its replacement, and metal that has been dressed once is more likely to crack when it is bent again. Replacing the kit with the window is a sound rule.
The fourth is poor lapping. Pieces lapped upside down, or with too little overlap, rely on sealant rather than geometry, and sealant is a repair, not a flashing. A bead of mastic round a frame is a sign something has already leaked, and it is not a remedy for a lap that was wrong from the start.
The fifth is nail penetration. Fixings driven through a piece of flashing where water will run create small leak paths. Good practice keeps nails to the parts that will be covered.
A stain on the lining below a roof window is not proof the window has failed. Look at the flashing first, and look for the highest point where water could be entering.
If you already have a window that drips, our leaking roof window guide shows how to tell the causes apart.
Lead, aluminium and the cost of getting it right
Choosing the material is a decision about the roof as much as the window. Lead is soft, can be dressed to the exact profile of an old stone or slate covering, and lasts well when it is the right weight and properly laid. The Lead Sheet Training Academy publishes the manual for rolled lead made to BS EN 12588, and that standard is what the lead codes refer to. Each code names a sheet thickness, with the thicker codes kept for the harder-working spots. For flashings, the maximum length of a single piece is limited, since lead expands and contracts and an over-long strip will slowly creep until it splits. One trade source gives 1,500 mm as the limit for flashings in codes 4 and 5, and wedges holding a cover flashing in a masonry joint sit no more than 500 mm apart.
Aluminium kits are formed in the factory to fit a given window and a given covering. They do not need on-site dressing for a standard tile profile, which makes the fitting quicker and the result predictable. They are less forgiving on an irregular roof, where a hand-dressed lead detail will follow the contours.
On price, there is no separate sourced figure for flashing alone, so we will not invent one. MyBuilder's guide to roof window installation (2026) puts typical UK fitting at £350 to £600 for standard jobs, labour and fitting only, with the window extra, and scaffold adding about £500. A flashing kit is part of the window package, and the cost difference between a correct kit and an almost-right one hardly registers beside the bill for stripping the lining and the roof back to cure a leak. Your fixed figure follows the survey.
Some roofs ask for more than a catalogue kit gives. A window set close to a valley, a chimney or a hip means the side pieces have to be combined with other leadwork, and the detail is made on site. So we study the whole slope, and not only the hole, before settling the window.
Timing, weather and what to check before and after
Flashing is the stage of the work during which the roof stands open to the weather. Once the covering is lifted and the opening is cut, the roof is exposed until the pieces are lapped and the covering is back. For that reason the work is planned so that the roof is not left open at the end of a day, and a temporary weathering is fixed if the window cannot be completed in one go. Our guide to fitting a roof window in winter goes into how cold and wet conditions affect the detail.
Before the work, ask what kit is specified and whether it is made for your window and your covering. The question sounds fussy, but a roofer who can name the kit code can also name the problem if it goes wrong. Ask whether the kit includes the underlay collar, and ask what will be done where the opening sits near a ridge, valley or chimney.
After the work, a short check will catch most faults before they become stains.
- From the ground or a ladder, look at the lower apron and the edges. There should be no visible gaps between metal and covering.
- Look at the sealant. It should be tidy and used sparingly, not a thick bead doing the work of a lap.
- Inside, check the lining beneath and around the frame after the first heavy rain, and again after the first spell of wind-driven weather.
It also helps to keep the paperwork. The flashing kit code, the window model and the date the work was done are the details a roofer needs if a leak ever appears, and they are easy to lose.
The regulations side of a roof window, covering the thermal limit and escape rules, is set out in roof windows and Building Regulations. For the wider service, including fitting and repair, see skylights and roof windows. Where a flashing fault is the cause of a leak, we repair where repair works, and renew the kit only if the old one cannot be made sound.